GPU Mining

What is Cryptocurrency and How does it work?
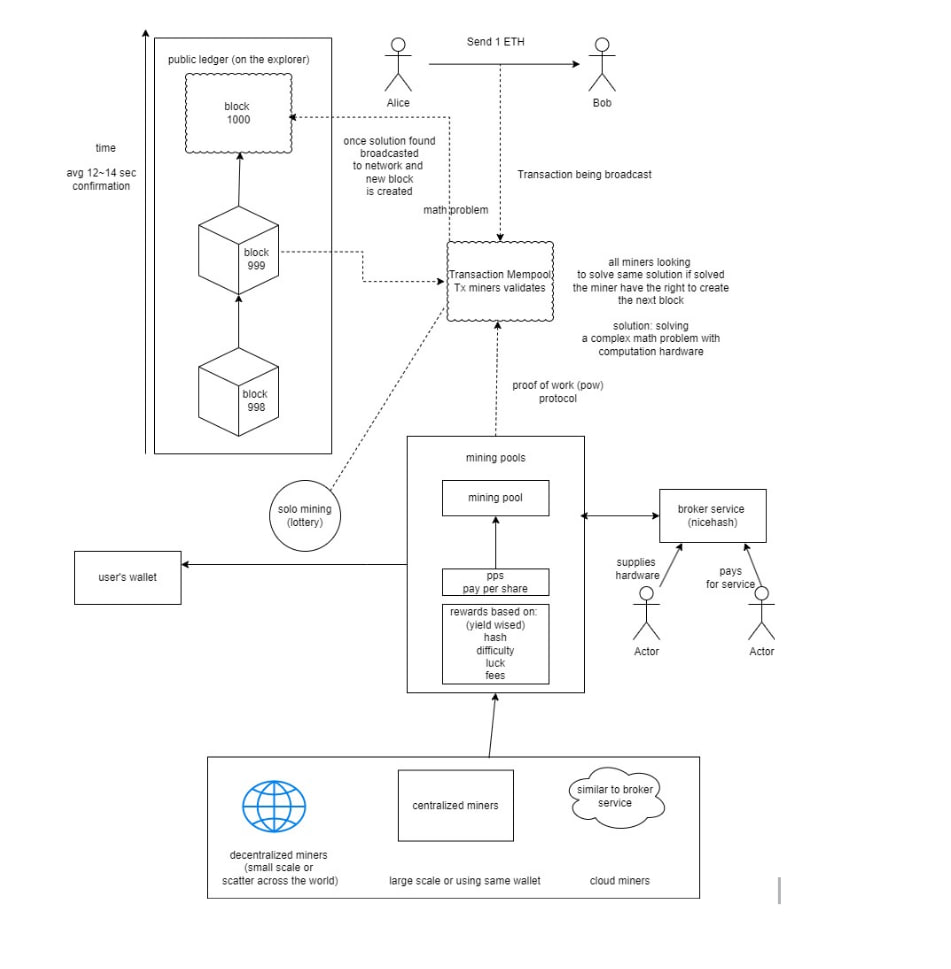
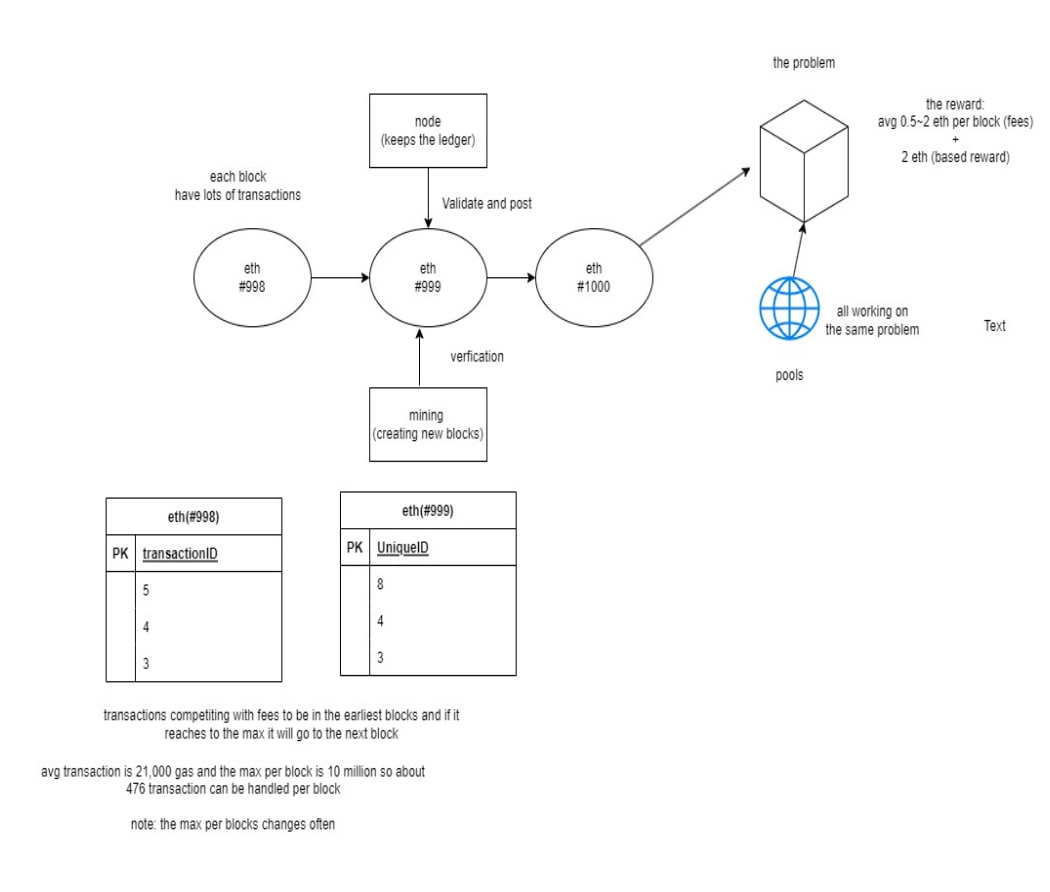
Cryptocurrency is digital money you can send, receive, or hold online without needing a bank. It’s powered by blockchain, a secure, public ledger that tracks transactions using nodes (computers) around the world that help verify each transaction. Unlike regular money, cryptocurrencies like Bitcoin and Ethereum are decentralized, managed by this network of nodes instead of a central authority.
Cryptocurrency mining, using a Computer Hardware to solve complex problems, runs on proof of work census model(POW). Miners earn rewards for validating transactions and creating new blocks in the blockchain—yielding cryptocurrency that can be converted into fiat money (traditional currency). However, these yield rewards fluctuate based on factors like network transaction fees, the difficulty level of mining, and sender’s bids to prioritize their transactions. Mining pools help balance these rewards by allowing participants to pool resources and share earnings proportionally, making it easier to earn consistent returns compared to solo mining. Some networks are also shifting to Proof of Stake (PoS), which involves staking coins rather than computational power, aiming for a more energy-efficient way to secure the network. Also I was using Wireshark to track mining activity out of curiosity.
Example: Sending 1 ETH from Alice to Bob
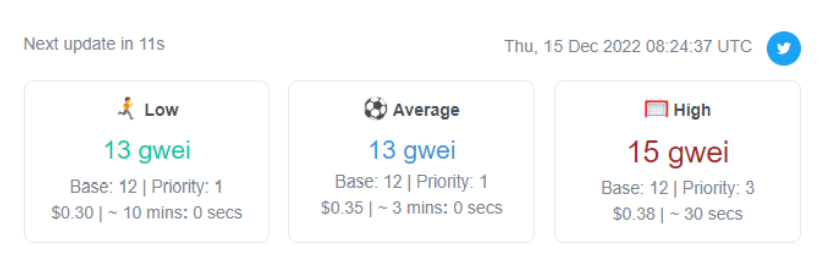
Total Fee Calculation:
Total Fee = gwei * (gas + tip(optional/priority))
Numbers Used: Note: 1 gwei = 0.000000001 ETH
- Gwei (priority fee): 100 gwei
- Gas (base fee): 21,000 gas
100 gwei * 21,000 gas = 2.1 million gwei
Converting gwei to ETH: 2.1 million gwei = 0.0021 ETH
Total Cost:
Alice needs to send 1.0021 ETH in total for Bob to receive exactly 1 ETH.
In Dollars (assuming ETH is $2000):
0.0021 ETH * $2000 = $4.20 fee
Summary:
- Alice sends: 1.0021 ETH
- Bob receives: 1 ETH
- Total transaction fee: $4.20 paid to the miner on the network
Hardware/Software Requirements:
- CPU: A basic processor is sufficient; opt for a cost-effective CPU that can support your mining rig. The community majority use socket type from LGA1151.
- Motherboard: Choose a motherboard with PCIe slots to support the number of GPUs you'll be connecting (usually via risers), but if not then can purchase a PCI Splitter. Make sure the motherboard is compatible with the CPU as well.
- RAM: 4GB of RAM is sufficient for this task.
- Storage: A 128GB SSD is recommended for Windows but 64GB worked for me previously, while a 64GB SSD is adequate for Linux-based setups.
- GPU: Select GPUs based on the required DAG size (usually >4GB will work for most mining algorithms). A DAG size calculator can help verify this for specific algorithms. Consult here DAG size calculator.
- Operating System: Options include Windows or specialized mining OSs like HiveOS or SimpleMining, which allow for remote management.
- PCIe Splitter: These can help increase the number of GPUs per motherboard by splitting PCIe slots, saving space and money. Ensure compatibility with your setup.
- Risers: PCIe risers allow GPUs to connect to the motherboard even if they’re not directly seated in a PCIe slot.
- Rig/Frame: A mining frame or rig structure keeps all components organized and well-ventilated.
- PSU (Power Supply Unit): Ensure your power supply meets or exceeds the total power requirements of all GPUs and other components. Follow the "80% rule" (avoid running the PSU at more than 80% capacity) for safety and efficiency.
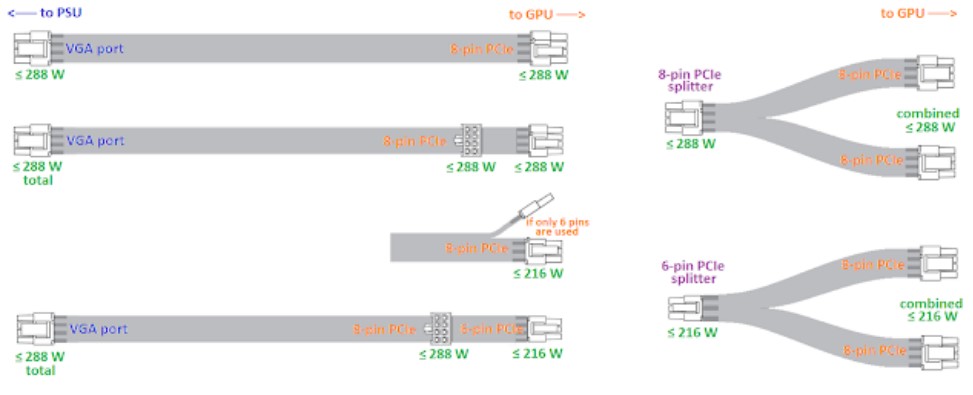
- Cables: Use only VGA/PCIe/PCIe splitter cables rated for GPUs, as for sata cables throw those away it’s not needed and it can cause danger when plugging into the riser. Lastly, use ethernet cables to avoid wifi adapters for reliable connection.
- Power Switch to turn on the machine.
Note:
When estimating the power supply needed for a mining rig, a good rule of thumb is to take the GPU's power consumption (available on sites like whattomine.com) and add about 150W for other components (CPU, motherboard, fans, etc.).
GPUs can be overclocked to lower power consumption. It’s better to calculate the full TDP of the GPU to account for any potential spikes in power usage. This ensures the software can adjust the overclock safely.
If the GPU is modded properly, it may consume only about 90–100W per GPU instead of the standard 120W. While this results in minor energy savings, it’s best practice to calculate based on the maximum TDP. Additionally, note that each algorithm varies in power intensity, with some being more demanding than others, which can also affect the GPU's lifespan.
For example, a rig with six 1660 Ti GPUs (TDP = 120W each) requires approximately 720W. To ensure sufficient capacity, aim for a 1000W PSU.
Since your PSU will ideally run 24/7, follow the 80% rule: avoid using more than 80% of the PSU’s capacity for better efficiency and longevity. Choose a PSU rated Gold or higher (Gold, Platinum, or Titanium) for greater energy efficiency and reliability. Additionally, ensure it has multiple VGA ports for powering GPUs.
Many miners consider EVGA G2 PSUs a solid standard. For larger rigs, using multiple smaller PSUs linked together can offer more flexibility and reliability.
If noise is not an issue, you might consider a server PSU instead of a standard computer PSU. Server PSUs are designed for continuous 24/7 operation and are often more cost-effective. Keep in mind that the power output of a server PSU can vary depending on whether it’s connected to a 120V or 240V outlet.
Ensure the breakout board includes enough PCIe connectors for powering GPUs. Note that VGA ports (video output) are not typically part of breakout boards. Trusted vendors like Parallel Miner offer options such as:
- The X11 AMP, which features 16 PCIe connectors.
- The ZSX model, which includes ATX and CPU power connectors for broader compatibility.
Select a breakout board that matches your rig’s power requirements to ensure smooth operation.
Step by Step:
- Currency: Determine the asset coin you are interested in and visit the coin’s webpage to find out the consensus model (PoW/PoS) and the requirements to join the network.
- Wallet: Create a wallet for the coin and keep a record of the wallet address.
- Assemble: Put together the components and ensure everything is set up correctly, especially the power draw inputs and outputs.
- Windows (Optional): Edit the software's .bat file using Notepad.
- Miner: Find the miner most suited for your GPU. Use Trex for Nvidia GPUs and Teamredminer for AMD GPUs.
- Pool: Find a mining pool.
- Wallet Address: Change the default wallet address (usually the software owner’s wallet) to your own address.
- Start: Start the client and run the miner.
- Optional: To run the machine efficiently, overclock the GPU. Research from the community (e.g., Reddit) and test the best stable settings for the specific GPU being used.
Troubleshooting Tips for Mining:
- Update BIOS: Update the motherboard’s BIOS and enable “Above 4G Decoding” to support multiple GPUs. Disable unnecessary BIOS features like GPU and RAM overclocking.
- Airflow: Ensure good airflow with proper intake and outtake in the room to prevent overheating.
- Undervolt/Overclock: Optimize performance and reduce TDP settings based on the mining algorithm to improve efficiency.
- Fan Settings: Adjust fan speed to keep the GPU’s memory chips cool, as they often run hotter than the core. A fan speed of around 80% is recommended since fans are replaceable and relatively inexpensive.
- Spacing: Place GPUs with at least one GPU’s width of space between them for better airflow.
- Ethernet Connection: Use an Ethernet cable instead of Wi-Fi for a more stable and reliable connection.
- Extra Risers: Keep extra risers on hand. If a GPU stops being detected, it’s often due to a faulty riser. While risers typically last a few months, defective ones might fail sooner or need quick cleaning with an air blower.
System Check: Run the rig for at least 20 minutes before leaving it unattended to ensure smooth operation. Confirm that power consumption of the rig is within the 80% capacity rule and that wall outlets are in good condition.
For Windows Users (Not Recommended):
- Streamlined Setup: Use a minimal Windows build. Run a script to ensure the mining software auto-starts on boot.
- Disable Windows Updates: Turn off Windows Updates to prevent unexpected interruptions.
- Windows Activation: Activation isn't necessary for mining purposes.
- Virtual Memory: Set virtual memory to match the GPU count and VRAM. For example, for six 1660 Ti (6 GB) GPUs, allocate approximately 36 GB (36,000 MB).
While Windows can be used, it requires additional setup to run smoothly 24/7. HiveOS or SimpleMining are more efficient for scaling operations despite a small fee, offering advanced mining features not found in Windows.
Maintenance:
- Regular Dust Cleaning: Use an air blower regularly to clean dust from the machine. Hold the GPU firmly while cleaning each one.
- VRAM Temperature Check: Monitor VRAM temperatures, and if they exceed 90°C, disassemble the GPU to replace and upgrade the thermal pads.
- Performance and Hashrate Monitoring: Regularly monitor the GPU's performance and hashrate (if used for mining).
Deployment:


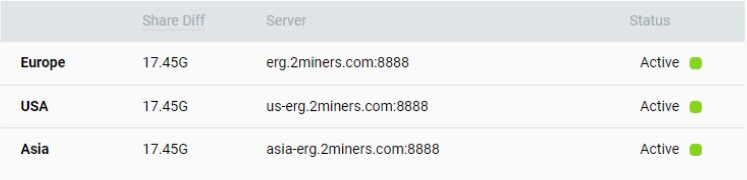
Mining pool:
Pick the closest region to avoid latency and reliability
Echo packets to the destination:
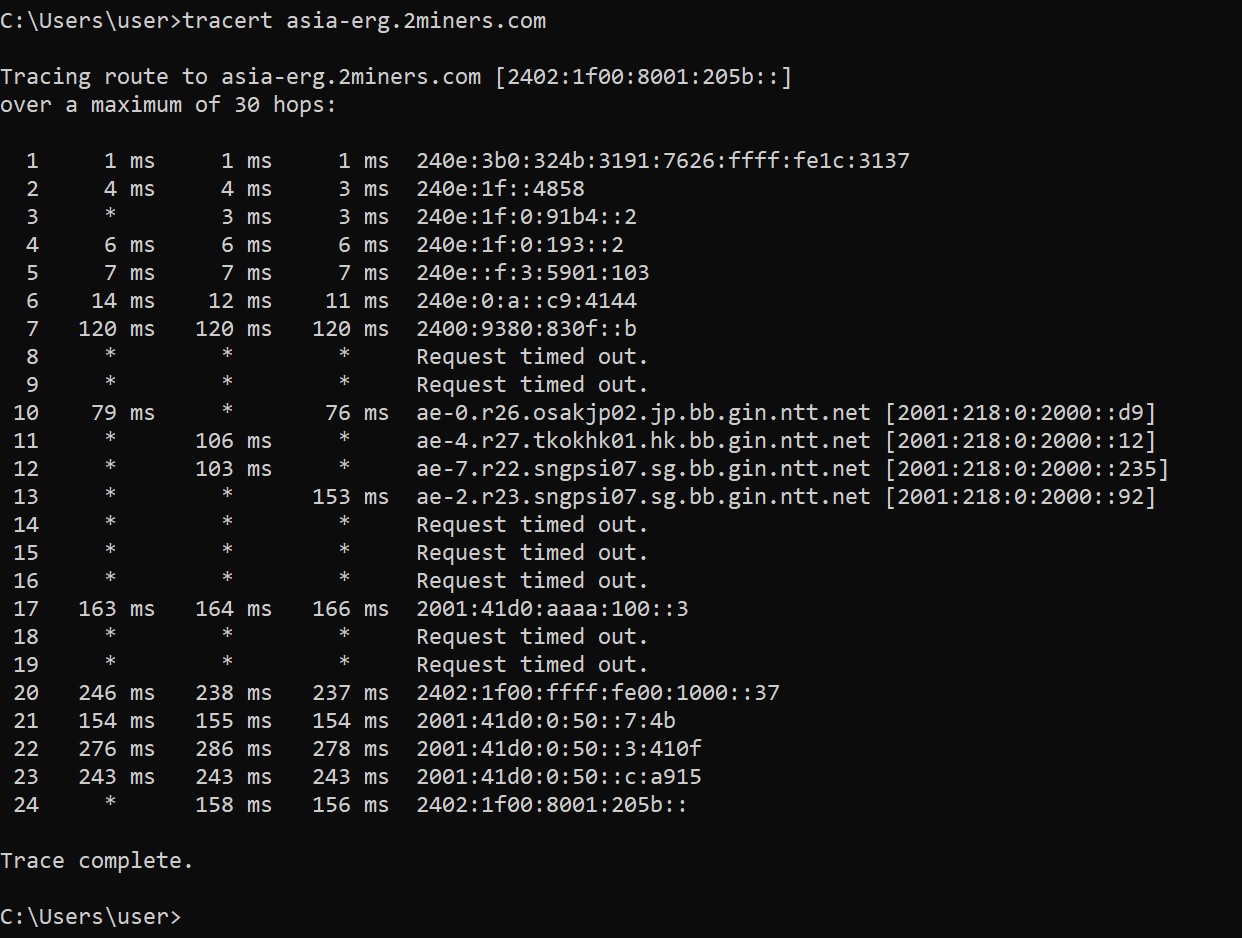
Finding out IP address through DNS:
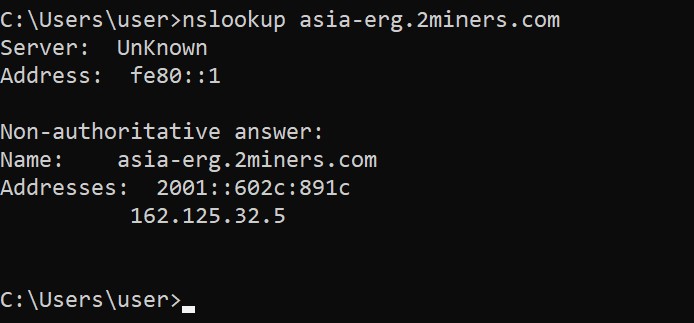
asia-erg.2miners.com = 162.125.32.5
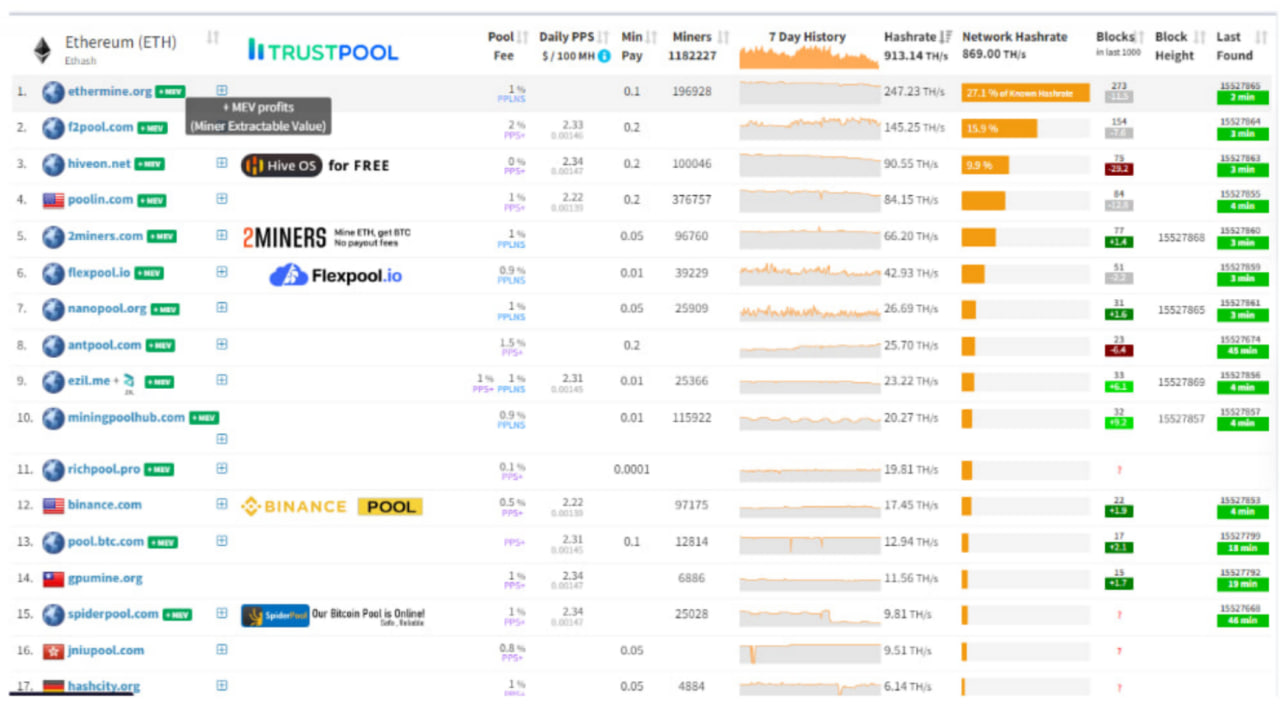
The fees and the network of in different pools:
Use case Diagram:
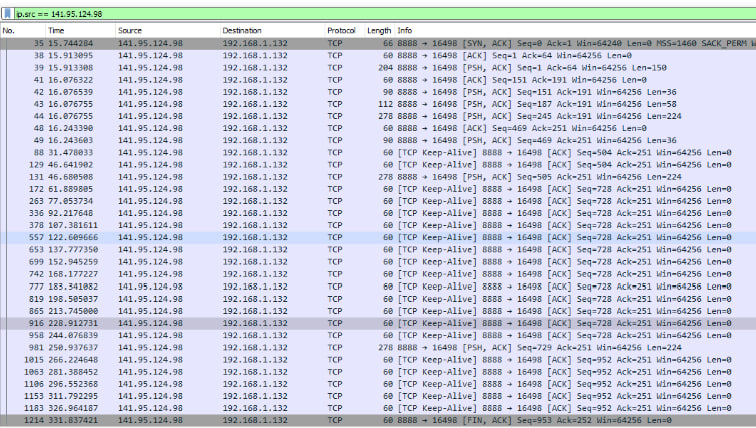
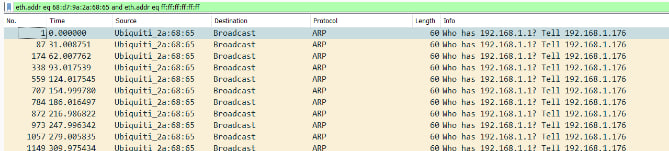
Network traffic:
These are the protocols detected. Communication happening between the pool and the computer. 141.95.124.98 is one of the pool’s ipv4 addresses and 192.168.1.132 is the computer’s ip.

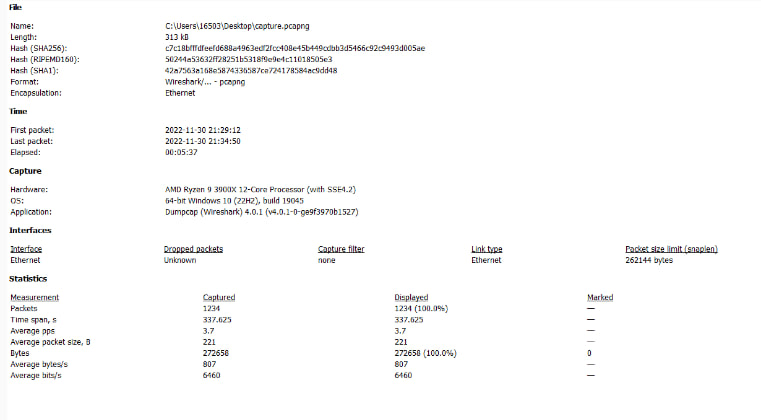
Capture file properties:
On this screencap, it provides a full breakdown of what exactly was used, down to the version of Wireshark, and a log of our hardware and OS used. The link type and packet size are shown, but the amount of dropped packets remain unknown. 100% of the packets were captured and displayed and nothing was shown to be marked.
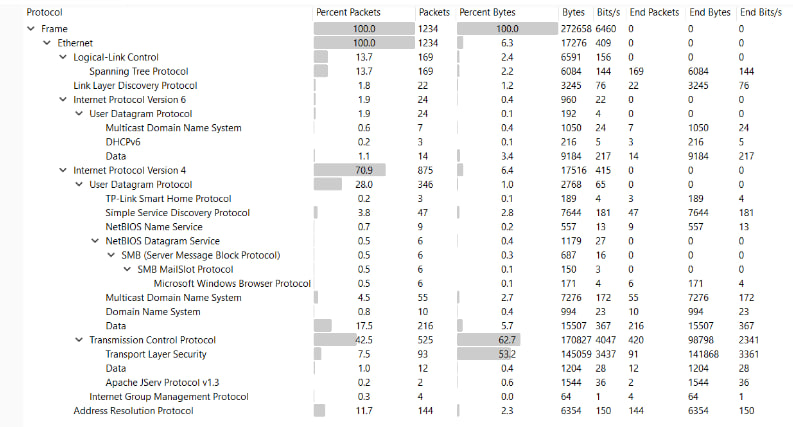
Protocol hierarchy:
Conversations:
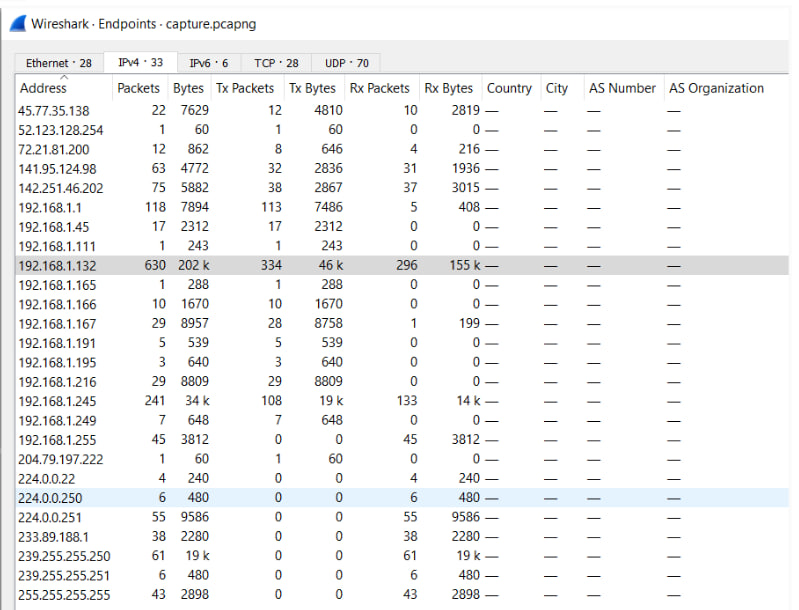
Endpoints:
An end point in Wireshark is one of the two devices engaged in a network communication. The IP address and port number assigned to each end point uniquely identify the device on the network. When examining a conversation in Wireshark, the end points are shown at the top of the packet list, along with protocol details and the number of packets exchanged. This is useful for monitoring network traffic since it allows you to rapidly identify the devices engaged in a discussion and observe how they communicate with one another.
Evidence of security:
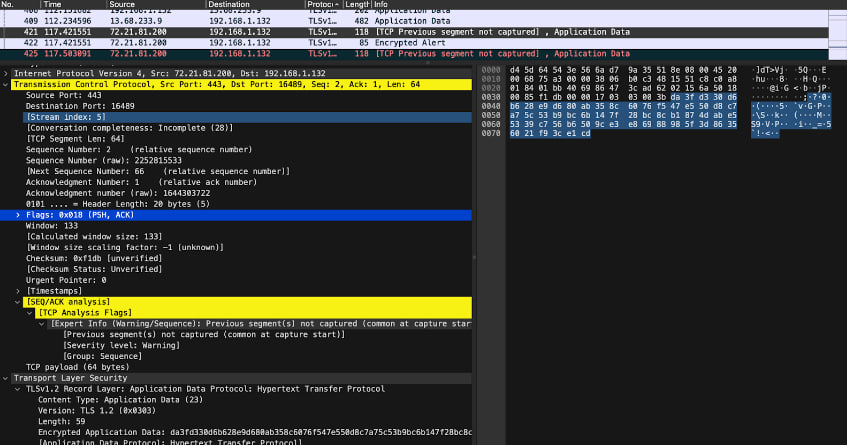
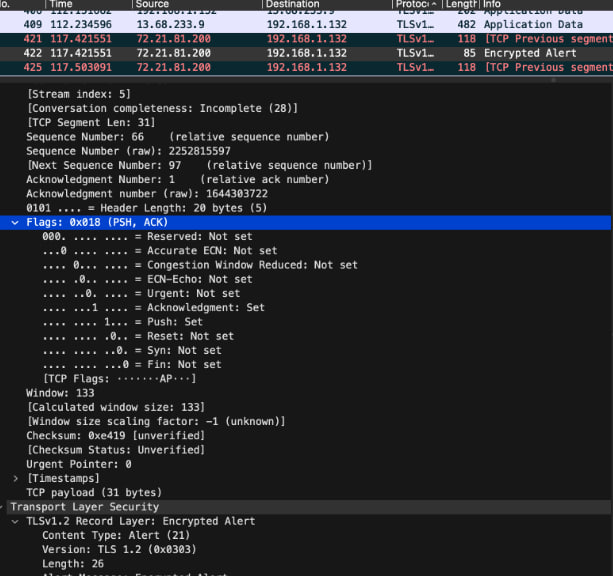
Scenario:
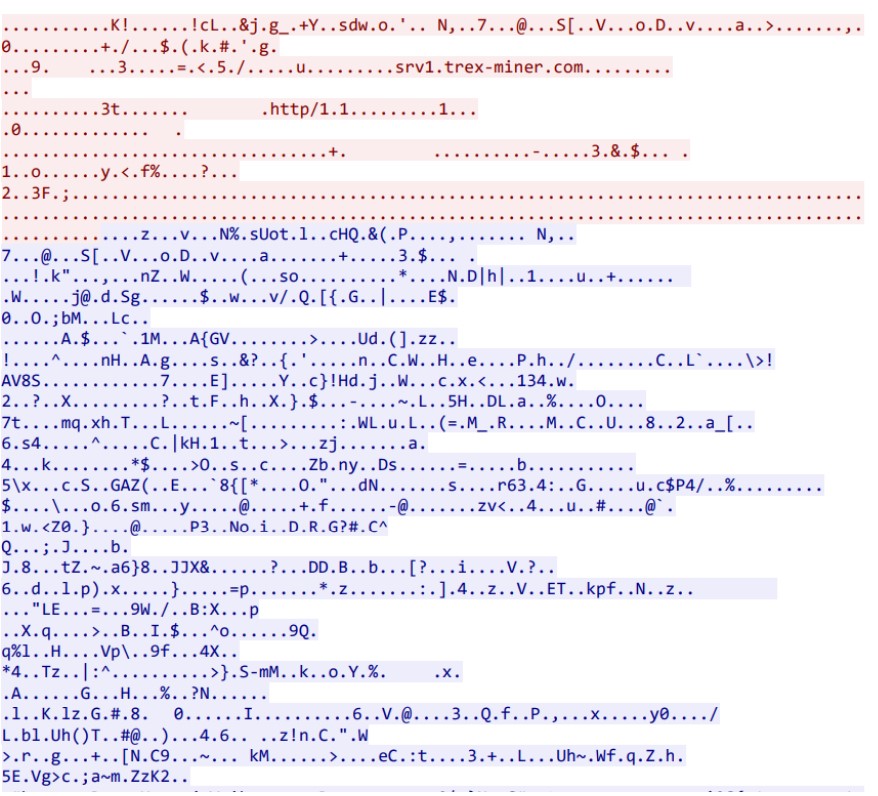
As we can see the communication between the miner and the pool is encrypted.
Summary:
In conclusion, this experience taught me far more than traditional learning from an instruction book. I had to search various resources, like Bitcointalk, Reddit, YouTube, and Discord, to solve issues I encountered over the years.
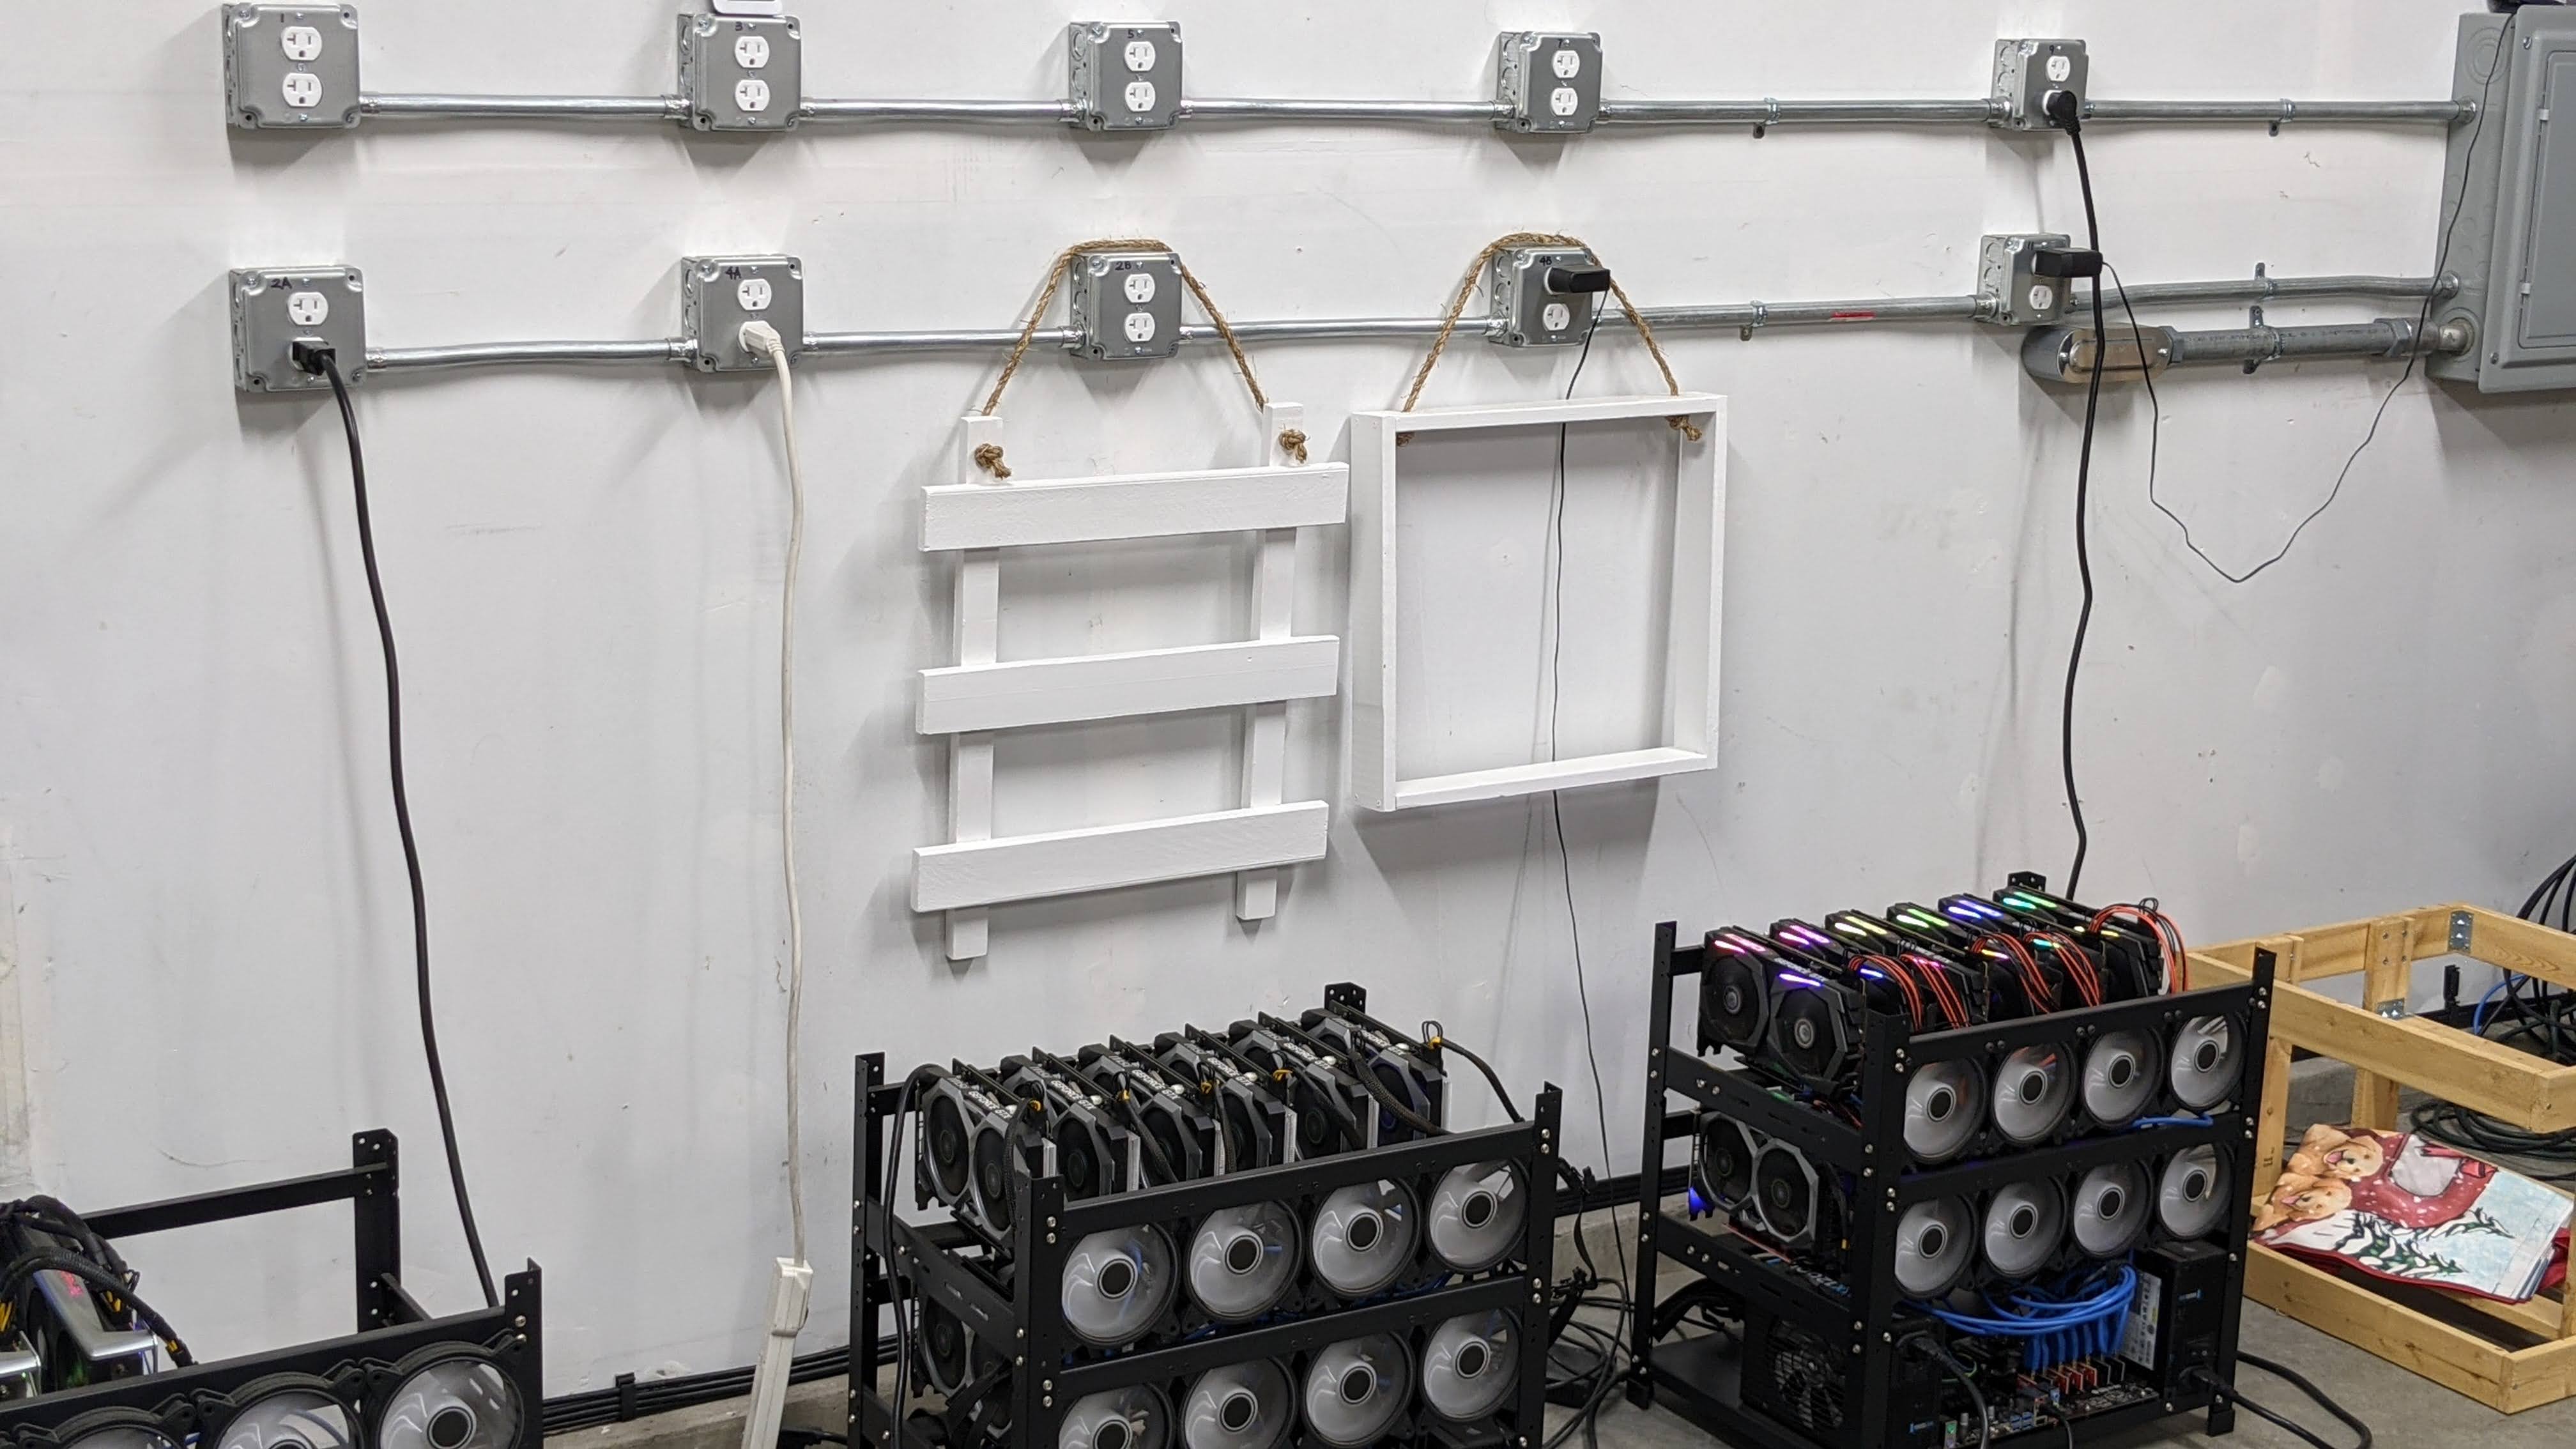
This was my first project scaling up from a single rig to six rigs at its peak in my garage, which eventually required a dedicated space for the mining setup. I hadn’t anticipated needing to do additional hands-on work, like building a rig frame from wood, installing an exhaust fan in the garage, setting up multiple electrical outlets, and modifying the garage door to improve airflow by bringing in outside air. I also had to learn the basics of data center HVAC principles to manage temperature and airflow effectively in this unconventional environment.
Also curious how it runs around the network through the mining pools and the blockchain. I was able to identify the network communication happening throughout the capture with the use of Wireshark. With the help of Wireshark, we were to find the protocols, conversation, endpoints, and lastly the security aspect making sure the communication is encrypted or unencrypted must be identified.